12 Save These DIY Mud Kitchen Outdoor Play Ideas Before You Build
A backyard mud kitchen can turn a quiet corner of the yard into the place kids remember most. It gives them permission to mix, scoop, pour, stack, rinse, sort, and create without worrying about making a mess inside the house. For many USA families, it is also a budget-friendly way to build open-ended play using wood scraps, old pans, crates, buckets, and weather-safe materials already sitting in the garage. The best designs are not always fancy; they are sturdy, safe, easy to clean, and inviting enough to use every sunny afternoon.
Before you build, it helps to think like both a parent and a child. Parents usually care about safety, shade, drainage, storage, and how the play area looks beside the patio or fence. Kids care about water, mud, tools, secret shelves, little menus, and the feeling that the space belongs to them. That balance is where the best ideas happen. A well-planned outdoor play station can look charming in photos while still surviving real digging, splashing, and muddy hands through spring, summer, and early fall without leaving the yard feeling messy forever.
This guide keeps the ideas practical, pretty, and realistic for everyday backyards. You will find build concepts that work for small patios, suburban fences, side yards, decks, and larger lawns. Some ideas use pallets and reclaimed wood, while others lean on crates, planters, gravel, fabric shade, or simple hardware. The goal is not to copy one exact setup, but to choose pieces that fit your space, budget, tools, and child’s age. Save the ideas that match your yard, then mix them into a design that feels personal and easy to maintain.
A good mud kitchen should invite messy play without creating daily cleanup stress. That means rounded corners, stable bases, washable bowls, good drainage, and storage that keeps loose items from spreading across the yard. It also means choosing surfaces that age well outdoors, especially if your climate brings hot summers, heavy rain, snow, or humid weather. Use these ideas as a planning board before you buy materials. By the end, you will know which features are worth adding first and which small details make the biggest difference for everyday family use.
1. Pallet Sink Station
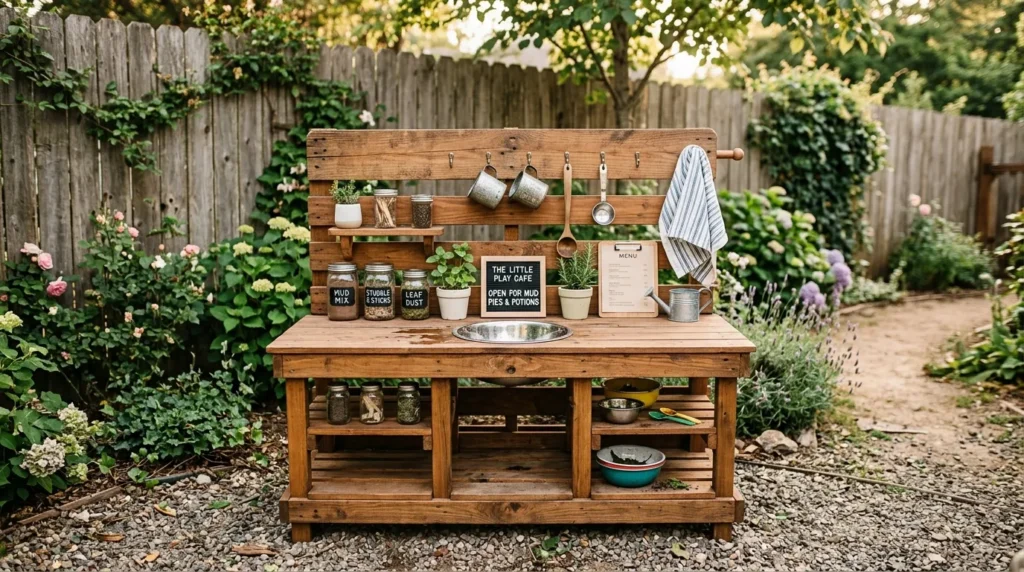
- Use a sanded pallet as the main frame to keep the build low-cost, rustic, and easy to customize.
- Add a stainless bowl as a removable sink so kids can wash leaves, rocks, spoons, and muddy hands.
- Mount the station against a fence, deck rail, or shed wall for extra stability and a cleaner backyard layout.
- Seal the wood with an exterior-safe finish so it lasts through rain, sun, and regular splashing.
- Add hooks, a towel peg, and a small lower shelf to make the station feel useful and complete.
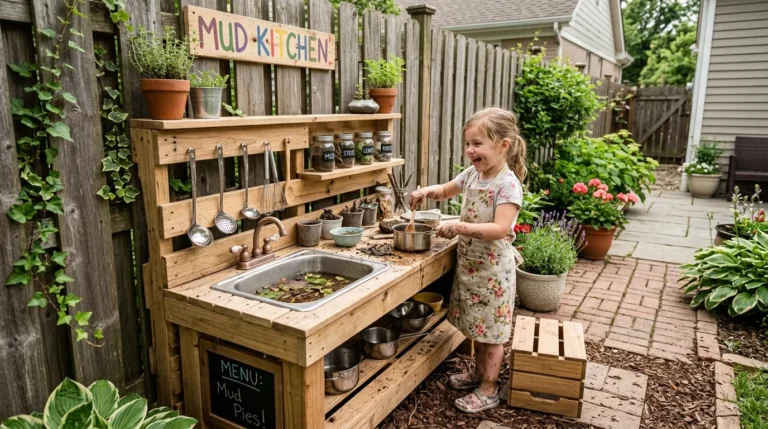
A mud kitchen feels more real when kids have a place to rinse, scoop, and pretend-wash their treasures outside. A simple pallet sink station gives the whole setup a playful backyard café feeling without needing plumbing or expensive materials. You can use a weathered pallet, a stainless mixing bowl, and a few hooks for spoons or tin cups. Set it near a fence, deck rail, or shaded wall so it looks intentional. In my experience, this one feature makes children stay longer because water changes everything about outdoor pretend play.
The best part is how quickly this idea turns a plain corner into a working play station. Cut a round hole for the bowl, sand every rough edge, and add a lower shelf for buckets or mud pie pans. A removable bowl is easier to empty, clean, and store during winter. If you want a softer look, stain the pallet in warm cedar or paint it sage green, cream, or charcoal. Add a small “wash up” sign and the station suddenly feels like something from a handmade backyard play café.
2. Crate Storage Wall
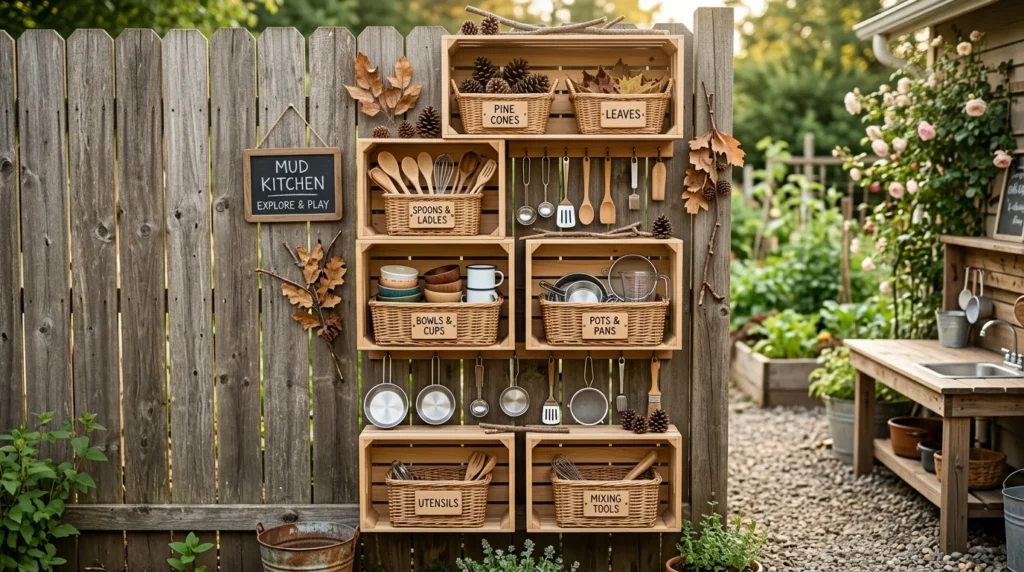
- Stack or mount crates vertically so tools, bowls, and pretend ingredients stay visible and easy to reach.
- Use wooden crates for a farmhouse look, or plastic milk crates for a durable, washable play area.
- Place heavier items on lower shelves to reduce tipping risk and keep the setup safer for younger children.
- Label each crate with simple words or picture tags to make cleanup part of the play routine.
- Drill drainage holes if crates may collect rainwater, especially in humid or storm-prone areas.
Storage can make or break the way a mud kitchen works every day. A crate storage wall keeps bowls, scoops, strainers, pinecones, sticks, and pretend ingredients off the ground while making the whole area look organized. Use wooden crates, milk crates, or shallow wall baskets attached to a fence panel or freestanding frame. Keep heavier items low and lighter items higher for safety. I’ve noticed that when children can see their tools clearly, they use more imagination because everything feels available, not buried in a toy bin somewhere during busy afternoon play.
This setup also gives the play space a strong visual backdrop. You can arrange crates in a neat grid, stagger them for a collected farmhouse look, or paint each one in soft earthy colors. Add labels like rocks, cups, pans, leaves, and spoons so cleanup becomes part of the routine. For rainy areas, drill small drainage holes in crate bottoms and avoid storing anything that traps water. A crate wall is especially helpful in narrow yards because it adds storage vertically without stealing floor space from active outdoor playtime outside.
3. Mud Pie Counter
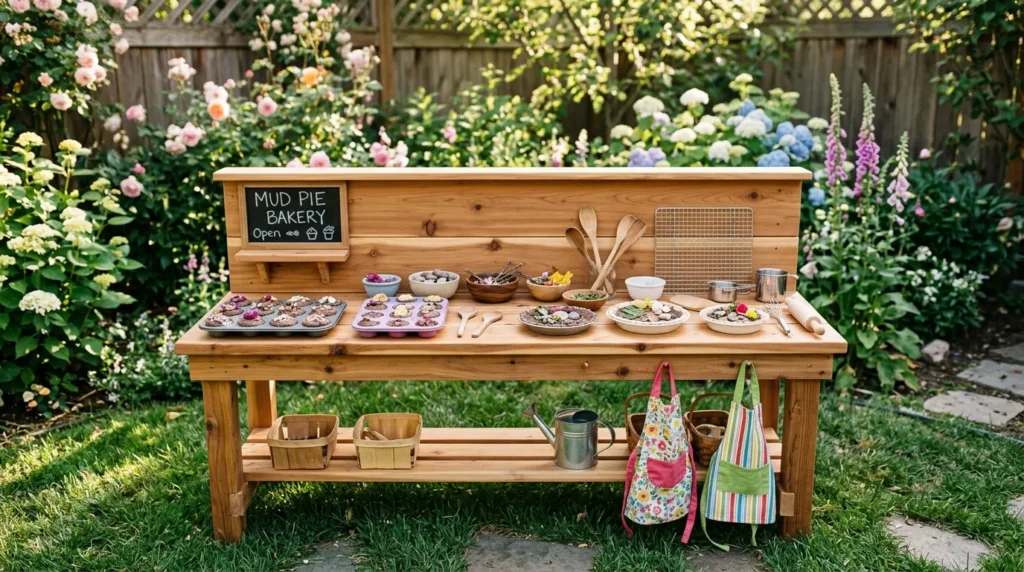
- Build one wide counter surface where children can mix mud pies, decorate leaves, and line up creations.
- Use sealed plywood, cedar planks, reclaimed boards, or an old tabletop for a practical work surface.
- Keep the height child-friendly so little ones can stand comfortably without stretching or bending too much.
- Add muffin tins, pie pans, spoons, cups, and small bowls for pretend baking and sensory play.
- Choose a darker stain if you want the counter to hide muddy marks between deeper cleanups.
Every mud kitchen needs one generous surface where the messy magic can happen. A mud pie counter gives kids space to pat, stir, pour, decorate, and line up their creations like a tiny bakery display. You can build it from a reclaimed tabletop, sealed plywood, an old potting bench top, or cedar boards screwed to a sturdy frame. Aim for a height that lets your child stand comfortably with elbows slightly bent. That small detail matters because a comfortable counter keeps play flowing instead of becoming frustrating during longer backyard afternoons.
The counter is where the whole setup starts to feel useful instead of decorative. Add a raised back ledge to stop tools from falling behind the station, then place a few thrifted muffin tins, pie pans, and wooden spoons nearby. If multiple kids will use it, make the surface long enough for side-by-side play to reduce arguments. For a polished look, sand it smooth and seal it with an exterior finish. A darker stain hides muddy fingerprints, while a lighter finish gives the corner a fresh cottage feel in family photos.
4. Gravel Floor Zone
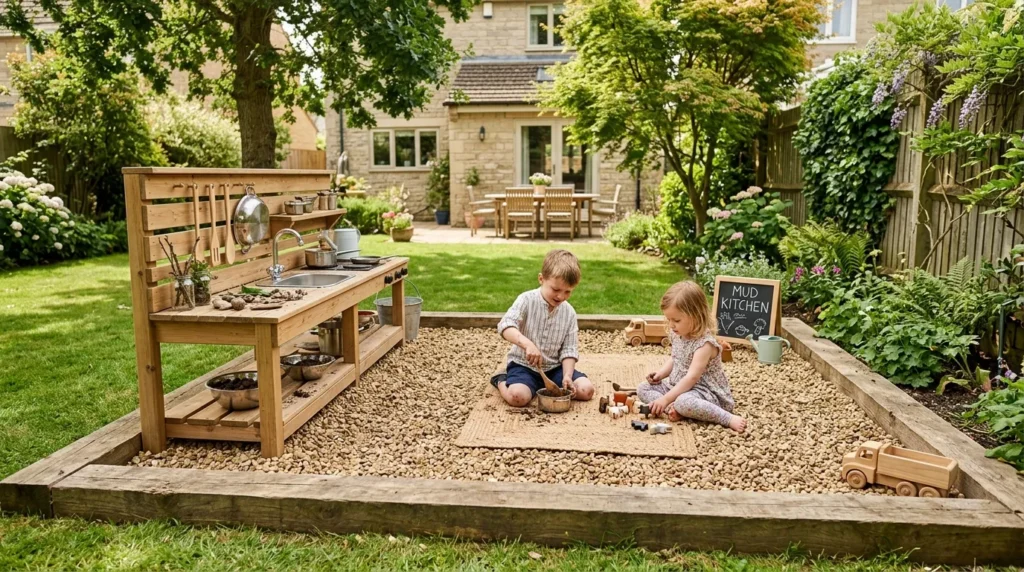
- Use pea gravel, small river rock, or decomposed granite to create a clean, defined play surface.
- Add landscape fabric underneath to slow weeds and keep the ground easier to manage over time.
- Frame the space with timber, brick, stone, or flexible edging so the area feels intentional.
- Choose lighter gravel in hot climates because darker stone can become warm under direct afternoon sun.
- Place an outdoor mat nearby so kids have a spot to wipe shoes before walking inside.
The ground under a mud kitchen matters more than most people expect. A gravel floor zone helps with drainage, reduces slippery patches, and gives the play area a finished shape in the yard. Pea gravel, small river rock, or decomposed granite can work well if the area is edged properly. Start with landscape fabric, add a simple border, then spread the gravel evenly. That’s why many designers recommend defining messy play zones clearly, especially when the rest of the yard is grass, mulch, or patio stone near the house after rain.
A defined floor instantly makes the kitchen look planned instead of randomly placed. It also gives kids a clear boundary for where mud play belongs, which helps protect garden beds and walkways. Use timber edging, stone blocks, brick, or flexible landscape edging to frame the zone. Keep the surface level and check it often for sharp pieces, especially after heavy rain. If your yard gets very hot, choose lighter gravel because dark stone can warm quickly in summer sun. Add a small outdoor mat nearby for shoes before going inside again.
5. Garden Hose Tap
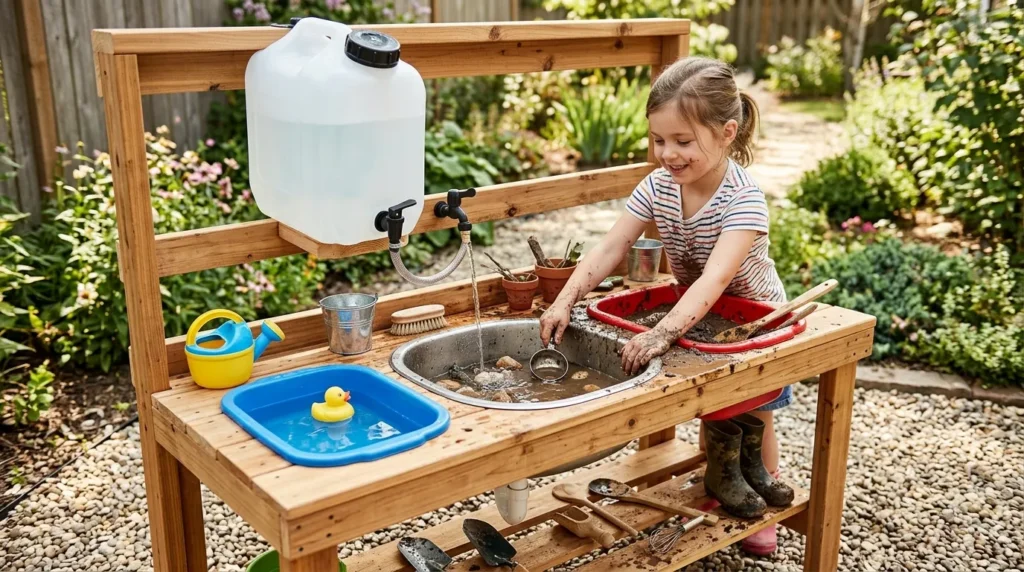
- Use a nearby hose, camping jug, beverage dispenser, or rain barrel spout for controlled water play.
- Keep the water flow small so children can pour, rinse, and mix without flooding the play space.
- Place the water source above a bowl or tub so spills naturally fall into the sink area.
- Use separate tubs for clean water and mud mix to make the play area easier to reset.
- Teach children simple water rules, especially during dry weather or local water restriction periods.
Water is the feature that turns simple dirt play into a full sensory experience. A garden hose tap setup can be as basic as a nearby hose with a child-safe spray nozzle or as polished as a mounted water dispenser above the sink bowl. You do not need permanent plumbing to make it fun. A refillable beverage dispenser, camping water jug, or rain barrel spout can give kids controlled access. The key is limiting flow so the play stays exciting without flooding the yard or wasting water during warm weather.
This idea works best when water is easy to refill and easy to stop. Place the container on a sturdy shelf above the basin, then teach children to use small amounts for mixing, washing, and pouring. In dry states or during water restrictions, use one filled bucket for the session and make it part of the play challenge. Add a second tub for “clean water” and another for “mud mix” to keep things organized. With good drainage underneath, water play becomes manageable instead of turning into a swampy mess after every play session.
6. Chalkboard Menu
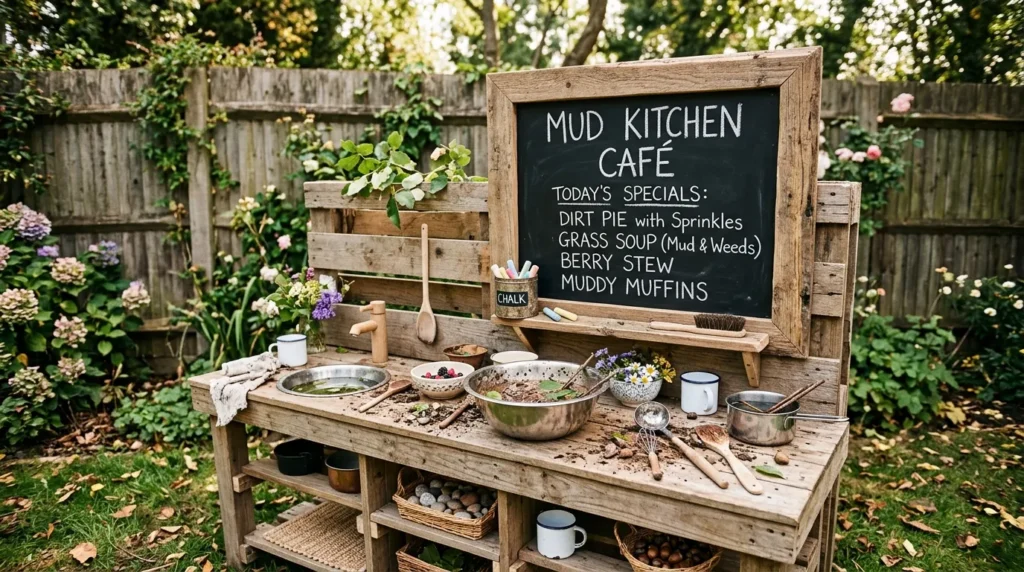
- Add a chalkboard panel above the counter so kids can write menus, recipes, prices, and silly specials.
- Use exterior chalkboard paint on plywood, an old cabinet door, or a framed weather-safe board.
- Keep chalk in a covered tin or small lidded container so it stays dry between play sessions.
- Draw simple icons for younger kids who are not writing yet but still want to join in.
- Frame the board with scrap wood to make the whole station look more finished and photo-ready.
A chalkboard menu adds instant charm because it gives the mud kitchen a story. Kids can write pretend recipes, daily specials, garden soup names, prices, or silly café signs while practicing early writing skills. Use exterior chalkboard paint on a plywood panel, an old cabinet door, or a framed board mounted above the counter. Keep chalk in a covered tin so it stays dry. I’ve seen this work well in many homes because it lets the space change every day without rebuilding or buying anything new for kids and parents.
The board also makes the setup more photo-friendly for Pinterest-style backyard inspiration. You can frame it with scrap wood, add a small shelf underneath, or hang a tiny towel beside it for wiping. For younger kids, draw simple icons like leaves, rocks, water drops, and pies so they can point and copy. For older kids, use it for pretend restaurant play, counting games, or seasonal themes. A chalkboard works especially well behind neutral wood because the dark surface creates contrast and helps the whole station feel finished in photos too.
7. Potting Bench Setup
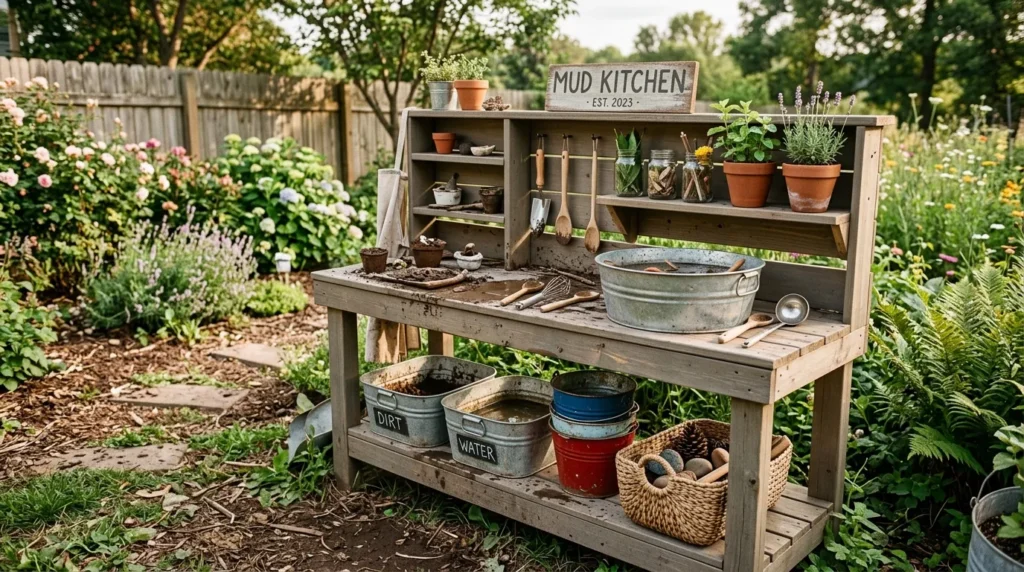
- Repurpose an old potting bench for a ready-made mud kitchen base with shelves and a worktop.
- Sand rough edges, tighten screws, and seal the wood before letting children use it regularly.
- Add a removable bowl on one side while keeping the other side open for mixing and sorting.
- Use the lower shelf for buckets, pans, watering cans, and larger play items that need space.
- Trim tall legs or add a stable platform if the bench height feels too high for younger kids.
A potting bench can become the backbone of a mud kitchen with almost no rebuilding. Its shelves, sturdy legs, and work surface already match the way children play with bowls, dirt, leaves, and water. Look for an old bench at yard sales, online marketplaces, or garden centers at the end of the season. Sand splintery spots, tighten loose screws, and seal the wood for outdoor use. This is a smart choice for families who want a finished-looking station without measuring and cutting every board from scratch on a modest budget.
The transformation feels natural because a potting bench already belongs in the backyard. The top becomes the prep counter, the lower shelf stores buckets, and the back rail can hold hooks for ladles or small pans. Add a removable sink bowl on one side and leave the other side open for mixing. If the bench is tall, trim the legs or add a sturdy step platform. A muted stain, woven baskets, and galvanized tubs can make the whole piece feel warm, useful, and ready for everyday outdoor play through the seasons.
8. Mini Herb Corner
- Add small pots of mint, basil, rosemary, parsley, or lavender for scent, color, and pretend cooking.
- Keep herbs in low planters so children can safely smell, touch, and pick approved leaves.
- Use terracotta pots for a classic garden look or metal buckets for a rustic farmhouse style.
- Label each herb with simple plant markers to support reading, responsibility, and garden learning.
- Place the herbs near the counter, but leave enough room for kids to move without knocking pots over.
A mini herb corner brings life, scent, and color into the mud kitchen. Small pots of mint, basil, rosemary, parsley, or lavender give kids safe natural ingredients to smell, touch, and pretend-cook with during play. Place the herbs in a low planter, crate shelf, or narrow raised box beside the counter. Choose hardy plants that can handle curious hands and regular trimming. In my experience, herbs make children slow down and notice texture, smell, and seasons, which adds a gentle learning layer to messy play for curious kids in the yard.
This idea also softens the look of wood, gravel, and metal tools. A few green plants can make even a simple mud station feel like part of the garden instead of a toy area dropped into the yard. Use terracotta pots for a classic look, metal buckets for farmhouse style, or colorful planters for a brighter child-friendly corner. Teach children which leaves they may pick and which plants are only for looking. Add plant labels so the corner supports reading, responsibility, and pretend recipe making during quiet garden play outside.
9. Recycled Cabinet Base
- Turn an old cabinet, vanity, nightstand, or base unit into a sturdy mud kitchen foundation.
- Remove unsafe hardware, glass panels, sharp hinges, and anything that may pinch small fingers.
- Paint the cabinet with exterior paint in olive, clay, white, blue-gray, or another garden-friendly shade.
- Use drawers for spoons, measuring cups, chalk, and pretend ingredients that need hidden storage.
- Raise the cabinet slightly on weather-safe feet so the base does not sit in wet grass.
An old cabinet can give a mud kitchen the charm of a tiny outdoor house. Instead of throwing away a worn bathroom vanity, nightstand, or kitchen base cabinet, turn it into a sturdy play station with doors, drawers, and built-in storage. Remove unsafe hardware, sand chipped edges, and seal every exposed surface. A cabinet base works especially well because it already has a solid shape and useful compartments. For many families, this is the fastest way to build something that looks custom without spending much money for a backyard corner.
The finished piece can feel surprisingly polished with a few simple changes. Replace glass inserts with wood panels, add rounded knobs, and cut a sink bowl into the top if the structure allows. Drawers can hold spoons, measuring cups, chalk, and small nature treasures. Doors hide buckets and extra pans when play is over. Use exterior paint in olive, blue-gray, white, or clay for a soft backyard look. Raise the cabinet slightly on weather-safe feet so the bottom does not sit directly in wet grass after rainy days with less damage.
10. Pebble Washing Area
- Add a shallow tray or tub where kids can rinse, sort, scrub, and transfer smooth stones.
- Choose stones that are large enough for your child’s age and avoid tiny pieces for younger children.
- Include a small colander, scoop, scrub brush, and towel to create a realistic cleaning station.
- Use gray, tan, cream, and river stones for a calm natural look that photographs beautifully.
- Place the washing area near the sink so water has a clear purpose and cleanup stays easier.
A pebble washing area gives children a job they can repeat for ages. Kids love sorting, rinsing, and moving small natural objects, and a dedicated washing tray keeps that activity from taking over the whole counter. Use a shallow plastic tub, old enamel tray, or low wooden box lined with a waterproof insert. Fill one side with smooth pebbles and leave the other side open for rinsing. This feature is simple, but it adds rhythm because children can wash, transfer, dry, and sort again during long summer afternoons outside together.
The setup works beautifully near the sink or hose because it gives water a clear purpose. Add a small colander, scrub brush, towel, and scoop so kids can act out a real cleaning station. Choose rounded stones that are large enough for your child’s age and avoid tiny pieces for younger children. For a pretty visual, mix gray, tan, cream, and river stones inside a neutral tray. The area adds texture to the build and helps children practice focus, hand strength, sorting, and careful movement during calm sensory play outdoors.
11. Canopy Shade Spot
- Add a shade sail, fabric canopy, umbrella, pergola panel, or canvas drop cloth above the play space.
- Secure fabric firmly so it does not flap loose during wind or sag badly after rain.
- Angle the shade slightly so rainwater runs off instead of collecting in the middle.
- Choose neutral canvas for a calm natural look or stripes for a playful coastal backyard style.
- Add a stump seat, small bench, or outdoor cushion nearby so children can rest between play sessions.
Shade can decide whether a mud kitchen gets used for ten minutes or two hours. A canopy shade spot protects children from harsh sun, keeps surfaces cooler, and makes the play corner feel like a tiny outdoor room. You can use a fabric canopy, shade sail, patio umbrella, pergola panel, or canvas drop cloth tied between posts. Choose breathable material and secure it well against wind. In warmer USA regions, this feature is not just decorative; it can make afternoon play safer and more comfortable during sunny weekends in summer.
A shaded setup also looks softer and more inviting from the house or patio. Hang the fabric slightly above adult head height if possible, then angle it so rainwater does not pool in the middle. Neutral canvas gives a calm natural look, while stripes feel playful and coastal. Add outdoor cushions on a nearby bench or a small stump seat under the edge of the shade. The result feels like a backyard activity nook where kids can cook, rest, talk, and return to play without overheating on warm afternoons outside.
12. Tool Rail Display
- Add a peg rail, towel bar, wooden dowel, curtain rod, or metal rail to hold play tools.
- Use S-hooks for spoons, strainers, tin cups, small pans, brushes, and lightweight ladles.
- Keep sharp, heavy, or breakable items out of reach, especially when younger children are playing.
- Group similar tools together so the rail looks tidy and helps children clean up independently.
- Mount the rail on a stained wood backboard if you want a warmer, more finished look.
A tool rail display makes the mud kitchen feel organized and real. Instead of tossing spoons, strainers, cups, and brushes into one bucket, hang them where children can choose exactly what they need. Use a towel bar, wooden dowel, curtain rod, peg rail, or slim metal rail fixed securely to the back of the station. Add S-hooks for tools with holes in the handles. This small detail improves independence because kids can set up, play, and clean up without asking where every piece belongs at their own pace each day.
The visual impact is bigger than the cost. A neat row of little pans, ladles, tin cups, and wooden tools creates that charming workshop look people love to save on Pinterest. Keep sharp or heavy items out of reach and use lightweight utensils from thrift stores or dollar sections. Group similar pieces together so the rail feels tidy, not cluttered. If you want a warmer finish, mount the rail on a stained wood backboard. It adds function, texture, and a satisfying finishing touch to the final backyard look outside today.
Slug
save-diy-mud-kitchen-outdoor-play-ideas
Meta Description
Save these DIY mud kitchen ideas before you build. Get practical backyard play setup tips using pallets, crates, gravel, herbs, shade, storage, and simple materials.
Image Prompts
1. Pallet Sink Station
Image Description: Rustic backyard mud kitchen made from a sanded wood pallet, stainless bowl sink, small hooks, tin cups, cedar stain, soft afternoon light, fence backdrop, gravel floor, simple towel peg, cozy handmade play café mood, eye-level Pinterest-style photo.
2. Crate Storage Wall
Image Description: Organized mud kitchen storage wall with stacked wooden crates, labeled baskets, spoons, bowls, pinecones, leaves, and small pans, soft earthy colors, fence-mounted layout, warm daylight, tidy farmhouse backyard style, clear vertical storage design, front-facing Pinterest image.
3. Mud Pie Counter
Image Description: Wide wooden mud pie counter with muffin tins, pie pans, wooden spoons, small bowls, smooth sealed surface, natural cedar tones, garden backdrop, child-height layout, soft sunlight, charming backyard bakery feel, clean Pinterest-style composition from a slight angle.
4. Gravel Floor Zone
Image Description: Defined outdoor play area with pea gravel flooring, timber edging, mud kitchen station, small outdoor mat, neutral wood textures, green grass border, sunny suburban backyard, clean drainage-friendly layout, practical family yard design, wide-angle Pinterest photo.
5. Garden Hose Tap
Image Description: Backyard mud kitchen water station with mounted water jug, small hose tap, removable sink bowl, clean and muddy tubs, watering can, cedar wood frame, light gravel floor, bright summer lighting, practical sensory play setup, close Pinterest-style view.
6. Chalkboard Menu
Image Description: Mud kitchen with black chalkboard menu, handwritten pretend recipes, wood frame, small chalk tin, spoons, bowls, neutral pallet station, rustic fence background, soft natural light, playful café styling, high-contrast Pinterest image with cozy backyard mood.
7. Potting Bench Setup
Image Description: Repurposed wooden potting bench used as a mud kitchen, removable sink bowl, lower shelf with buckets, galvanized tubs, woven baskets, muted stain, garden plants around it, warm natural lighting, useful farmhouse backyard play station, angled Pinterest photo.
8. Mini Herb Corner
Image Description: Mud kitchen herb corner with terracotta pots of mint, basil, rosemary, and lavender, small plant labels, wood counter, metal buckets, green garden textures, soft morning light, fresh sensory play mood, close-up Pinterest image with natural colors.
9. Recycled Cabinet Base
Image Description: Old painted cabinet transformed into a mud kitchen, olive green exterior paint, rounded knobs, small sink bowl, drawers for tools, raised weather-safe feet, backyard fence setting, soft clay and wood tones, charming recycled furniture play setup.
10. Pebble Washing Area
Image Description: Pebble washing tray beside a mud kitchen sink, smooth gray and tan river stones, small colander, scrub brush, scoop, towel, shallow enamel tray, natural wood surface, gentle outdoor light, calm sensory play layout, detailed Pinterest close-up.
11. Canopy Shade Spot
Image Description: Shaded backyard mud kitchen under neutral canvas canopy, wood play station, gravel floor, stump seat, outdoor cushion, soft filtered sunlight, relaxed summer mood, secure shade sail above, cozy outdoor room feeling, wide Pinterest-style backyard view.
12. Tool Rail Display
Image Description: Mud kitchen tool rail with hanging spoons, strainers, tin cups, small pans, wooden ladles, stained backboard, S-hooks, tidy arrangement, rustic wood textures, warm afternoon light, organized workshop-style play corner, close Pinterest image with clean styling.
Introduction
A backyard mud kitchen can turn a quiet corner of the yard into the place kids remember most. It gives them permission to mix, scoop, pour, stack, rinse, sort, and create without worrying about making a mess inside the house. For many USA families, it is also a budget-friendly way to build open-ended play using wood scraps, old pans, crates, buckets, and weather-safe materials already sitting in the garage. The best designs are not always fancy; they are sturdy, safe, easy to clean, and inviting enough to use every sunny afternoon.
Before you build, it helps to think like both a parent and a child. Parents usually care about safety, shade, drainage, storage, and how the play area looks beside the patio or fence. Kids care about water, mud, tools, secret shelves, little menus, and the feeling that the space belongs to them. That balance is where the best ideas happen. A well-planned outdoor play station can look charming in photos while still surviving real digging, splashing, and muddy hands through spring, summer, and early fall without leaving the yard feeling messy forever.
This guide keeps the ideas practical, pretty, and realistic for everyday backyards. You will find build concepts that work for small patios, suburban fences, side yards, decks, and larger lawns. Some ideas use pallets and reclaimed wood, while others lean on crates, planters, gravel, fabric shade, or simple hardware. The goal is not to copy one exact setup, but to choose pieces that fit your space, budget, tools, and child’s age. Save the ideas that match your yard, then mix them into a design that feels personal and easy to maintain.
A good mud kitchen should invite messy play without creating daily cleanup stress. That means rounded corners, stable bases, washable bowls, good drainage, and storage that keeps loose items from spreading across the yard. It also means choosing surfaces that age well outdoors, especially if your climate brings hot summers, heavy rain, snow, or humid weather. Use these ideas as a planning board before you buy materials. By the end, you will know which features are worth adding first and which small details make the biggest difference for everyday family use.
1. Pallet Sink Station
- Use a sanded pallet as the main frame to keep the build low-cost, rustic, and easy to customize.
- Add a stainless bowl as a removable sink so kids can wash leaves, rocks, spoons, and muddy hands.
- Mount the station against a fence, deck rail, or shed wall for extra stability and a cleaner backyard layout.
- Seal the wood with an exterior-safe finish so it lasts through rain, sun, and regular splashing.
- Add hooks, a towel peg, and a small lower shelf to make the station feel useful and complete.
A mud kitchen feels more real when kids have a place to rinse, scoop, and pretend-wash their treasures outside. A simple pallet sink station gives the whole setup a playful backyard café feeling without needing plumbing or expensive materials. You can use a weathered pallet, a stainless mixing bowl, and a few hooks for spoons or tin cups. Set it near a fence, deck rail, or shaded wall so it looks intentional. In my experience, this one feature makes children stay longer because water changes everything about outdoor pretend play.
The best part is how quickly this idea turns a plain corner into a working play station. Cut a round hole for the bowl, sand every rough edge, and add a lower shelf for buckets or mud pie pans. A removable bowl is easier to empty, clean, and store during winter. If you want a softer look, stain the pallet in warm cedar or paint it sage green, cream, or charcoal. Add a small “wash up” sign and the station suddenly feels like something from a handmade backyard play café.
2. Crate Storage Wall
- Stack or mount crates vertically so tools, bowls, and pretend ingredients stay visible and easy to reach.
- Use wooden crates for a farmhouse look, or plastic milk crates for a durable, washable play area.
- Place heavier items on lower shelves to reduce tipping risk and keep the setup safer for younger children.
- Label each crate with simple words or picture tags to make cleanup part of the play routine.
- Drill drainage holes if crates may collect rainwater, especially in humid or storm-prone areas.
Storage can make or break the way a mud kitchen works every day. A crate storage wall keeps bowls, scoops, strainers, pinecones, sticks, and pretend ingredients off the ground while making the whole area look organized. Use wooden crates, milk crates, or shallow wall baskets attached to a fence panel or freestanding frame. Keep heavier items low and lighter items higher for safety. I’ve noticed that when children can see their tools clearly, they use more imagination because everything feels available, not buried in a toy bin somewhere during busy afternoon play.
This setup also gives the play space a strong visual backdrop. You can arrange crates in a neat grid, stagger them for a collected farmhouse look, or paint each one in soft earthy colors. Add labels like rocks, cups, pans, leaves, and spoons so cleanup becomes part of the routine. For rainy areas, drill small drainage holes in crate bottoms and avoid storing anything that traps water. A crate wall is especially helpful in narrow yards because it adds storage vertically without stealing floor space from active outdoor playtime outside.
3. Mud Pie Counter
- Build one wide counter surface where children can mix mud pies, decorate leaves, and line up creations.
- Use sealed plywood, cedar planks, reclaimed boards, or an old tabletop for a practical work surface.
- Keep the height child-friendly so little ones can stand comfortably without stretching or bending too much.
- Add muffin tins, pie pans, spoons, cups, and small bowls for pretend baking and sensory play.
- Choose a darker stain if you want the counter to hide muddy marks between deeper cleanups.
Every mud kitchen needs one generous surface where the messy magic can happen. A mud pie counter gives kids space to pat, stir, pour, decorate, and line up their creations like a tiny bakery display. You can build it from a reclaimed tabletop, sealed plywood, an old potting bench top, or cedar boards screwed to a sturdy frame. Aim for a height that lets your child stand comfortably with elbows slightly bent. That small detail matters because a comfortable counter keeps play flowing instead of becoming frustrating during longer backyard afternoons.
The counter is where the whole setup starts to feel useful instead of decorative. Add a raised back ledge to stop tools from falling behind the station, then place a few thrifted muffin tins, pie pans, and wooden spoons nearby. If multiple kids will use it, make the surface long enough for side-by-side play to reduce arguments. For a polished look, sand it smooth and seal it with an exterior finish. A darker stain hides muddy fingerprints, while a lighter finish gives the corner a fresh cottage feel in family photos.
4. Gravel Floor Zone
- Use pea gravel, small river rock, or decomposed granite to create a clean, defined play surface.
- Add landscape fabric underneath to slow weeds and keep the ground easier to manage over time.
- Frame the space with timber, brick, stone, or flexible edging so the area feels intentional.
- Choose lighter gravel in hot climates because darker stone can become warm under direct afternoon sun.
- Place an outdoor mat nearby so kids have a spot to wipe shoes before walking inside.
The ground under a mud kitchen matters more than most people expect. A gravel floor zone helps with drainage, reduces slippery patches, and gives the play area a finished shape in the yard. Pea gravel, small river rock, or decomposed granite can work well if the area is edged properly. Start with landscape fabric, add a simple border, then spread the gravel evenly. That’s why many designers recommend defining messy play zones clearly, especially when the rest of the yard is grass, mulch, or patio stone near the house after rain.
A defined floor instantly makes the kitchen look planned instead of randomly placed. It also gives kids a clear boundary for where mud play belongs, which helps protect garden beds and walkways. Use timber edging, stone blocks, brick, or flexible landscape edging to frame the zone. Keep the surface level and check it often for sharp pieces, especially after heavy rain. If your yard gets very hot, choose lighter gravel because dark stone can warm quickly in summer sun. Add a small outdoor mat nearby for shoes before going inside again.
5. Garden Hose Tap
- Use a nearby hose, camping jug, beverage dispenser, or rain barrel spout for controlled water play.
- Keep the water flow small so children can pour, rinse, and mix without flooding the play space.
- Place the water source above a bowl or tub so spills naturally fall into the sink area.
- Use separate tubs for clean water and mud mix to make the play area easier to reset.
- Teach children simple water rules, especially during dry weather or local water restriction periods.
Water is the feature that turns simple dirt play into a full sensory experience. A garden hose tap setup can be as basic as a nearby hose with a child-safe spray nozzle or as polished as a mounted water dispenser above the sink bowl. You do not need permanent plumbing to make it fun. A refillable beverage dispenser, camping water jug, or rain barrel spout can give kids controlled access. The key is limiting flow so the play stays exciting without flooding the yard or wasting water during warm weather.
This idea works best when water is easy to refill and easy to stop. Place the container on a sturdy shelf above the basin, then teach children to use small amounts for mixing, washing, and pouring. In dry states or during water restrictions, use one filled bucket for the session and make it part of the play challenge. Add a second tub for “clean water” and another for “mud mix” to keep things organized. With good drainage underneath, water play becomes manageable instead of turning into a swampy mess after every play session.
6. Chalkboard Menu
- Add a chalkboard panel above the counter so kids can write menus, recipes, prices, and silly specials.
- Use exterior chalkboard paint on plywood, an old cabinet door, or a framed weather-safe board.
- Keep chalk in a covered tin or small lidded container so it stays dry between play sessions.
- Draw simple icons for younger kids who are not writing yet but still want to join in.
- Frame the board with scrap wood to make the whole station look more finished and photo-ready.
A chalkboard menu adds instant charm because it gives the mud kitchen a story. Kids can write pretend recipes, daily specials, garden soup names, prices, or silly café signs while practicing early writing skills. Use exterior chalkboard paint on a plywood panel, an old cabinet door, or a framed board mounted above the counter. Keep chalk in a covered tin so it stays dry. I’ve seen this work well in many homes because it lets the space change every day without rebuilding or buying anything new for kids and parents.
The board also makes the setup more photo-friendly for Pinterest-style backyard inspiration. You can frame it with scrap wood, add a small shelf underneath, or hang a tiny towel beside it for wiping. For younger kids, draw simple icons like leaves, rocks, water drops, and pies so they can point and copy. For older kids, use it for pretend restaurant play, counting games, or seasonal themes. A chalkboard works especially well behind neutral wood because the dark surface creates contrast and helps the whole station feel finished in photos too.
Part 2
Part 2 focuses on the details that make a mud kitchen feel more complete, useful, and beautiful in real life. Once the main counter, sink, floor, and storage are planned, the next step is adding features that support longer play sessions. Think herbs for pretend cooking, shade for hot afternoons, rails for hanging tools, and recycled furniture that gives the build character. These ideas help turn a simple backyard setup into a play area that feels settled, not temporary, and still stays practical for busy family routines through every season.
You do not need a large yard or a perfect carpentry setup to use these ideas. Many of them can be added slowly over a weekend, especially if you already have an old cabinet, bench, planter, or scrap wood available. The smartest builds are usually flexible, which means pieces can move, grow, or be replaced as children get older. Keep safety first, then choose the features that match your climate, storage needs, and the way your family uses the yard during evenings, weekends, and school breaks without adding extra stress.
7. Potting Bench Setup
- Repurpose an old potting bench for a ready-made mud kitchen base with shelves and a worktop.
- Sand rough edges, tighten screws, and seal the wood before letting children use it regularly.
- Add a removable bowl on one side while keeping the other side open for mixing and sorting.
- Use the lower shelf for buckets, pans, watering cans, and larger play items that need space.
- Trim tall legs or add a stable platform if the bench height feels too high for younger kids.
A potting bench can become the backbone of a mud kitchen with almost no rebuilding. Its shelves, sturdy legs, and work surface already match the way children play with bowls, dirt, leaves, and water. Look for an old bench at yard sales, online marketplaces, or garden centers at the end of the season. Sand splintery spots, tighten loose screws, and seal the wood for outdoor use. This is a smart choice for families who want a finished-looking station without measuring and cutting every board from scratch on a modest budget.
The transformation feels natural because a potting bench already belongs in the backyard. The top becomes the prep counter, the lower shelf stores buckets, and the back rail can hold hooks for ladles or small pans. Add a removable sink bowl on one side and leave the other side open for mixing. If the bench is tall, trim the legs or add a sturdy step platform. A muted stain, woven baskets, and galvanized tubs can make the whole piece feel warm, useful, and ready for everyday outdoor play through the seasons.
8. Mini Herb Corner
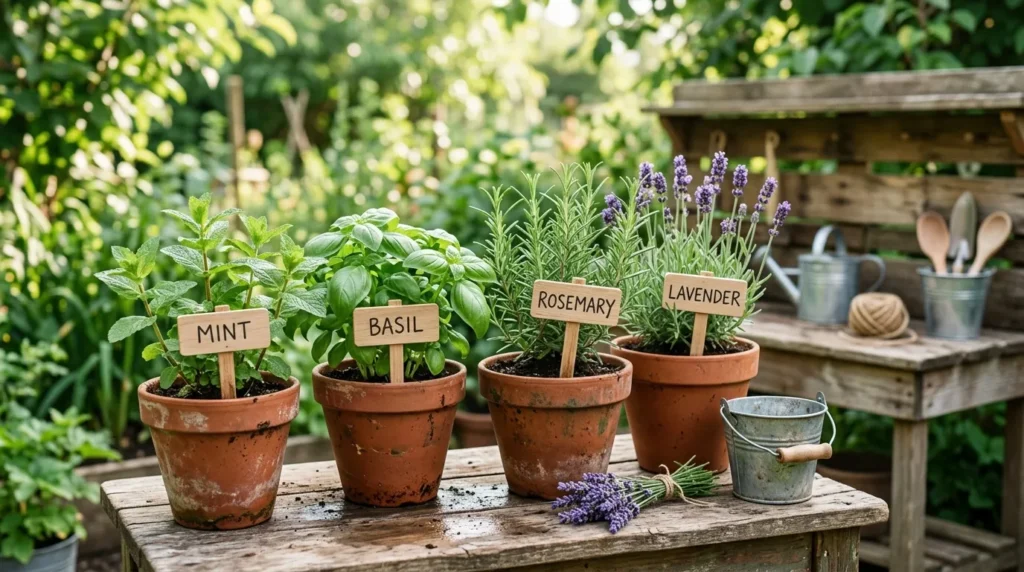
- Add small pots of mint, basil, rosemary, parsley, or lavender for scent, color, and pretend cooking.
- Keep herbs in low planters so children can safely smell, touch, and pick approved leaves.
- Use terracotta pots for a classic garden look or metal buckets for a rustic farmhouse style.
- Label each herb with simple plant markers to support reading, responsibility, and garden learning.
- Place the herbs near the counter, but leave enough room for kids to move without knocking pots over.
A mini herb corner brings life, scent, and color into the mud kitchen. Small pots of mint, basil, rosemary, parsley, or lavender give kids safe natural ingredients to smell, touch, and pretend-cook with during play. Place the herbs in a low planter, crate shelf, or narrow raised box beside the counter. Choose hardy plants that can handle curious hands and regular trimming. In my experience, herbs make children slow down and notice texture, smell, and seasons, which adds a gentle learning layer to messy play for curious kids in the yard.
This idea also softens the look of wood, gravel, and metal tools. A few green plants can make even a simple mud station feel like part of the garden instead of a toy area dropped into the yard. Use terracotta pots for a classic look, metal buckets for farmhouse style, or colorful planters for a brighter child-friendly corner. Teach children which leaves they may pick and which plants are only for looking. Add plant labels so the corner supports reading, responsibility, and pretend recipe making during quiet garden play outside.
9. Recycled Cabinet Base
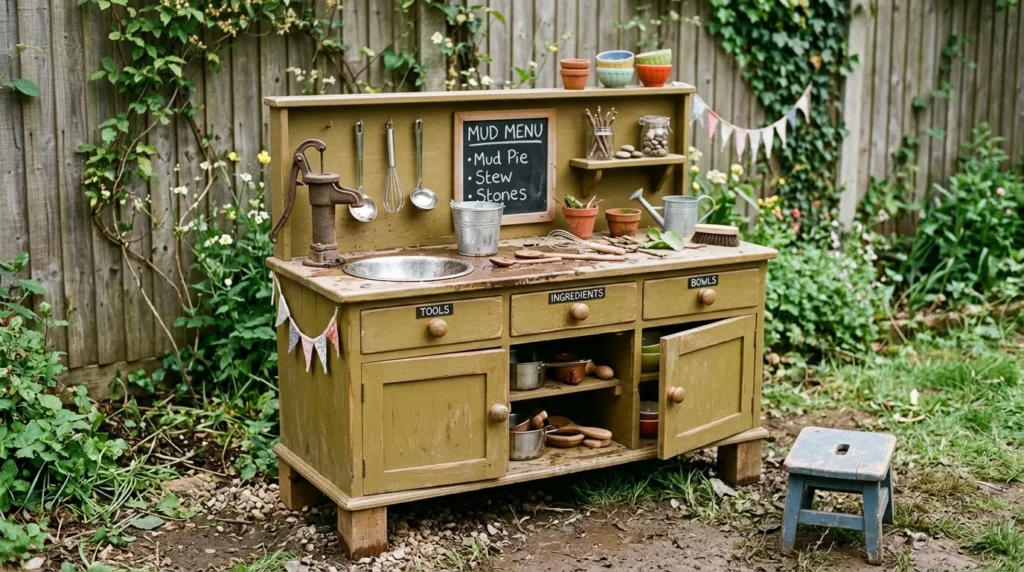
- Turn an old cabinet, vanity, nightstand, or base unit into a sturdy mud kitchen foundation.
- Remove unsafe hardware, glass panels, sharp hinges, and anything that may pinch small fingers.
- Paint the cabinet with exterior paint in olive, clay, white, blue-gray, or another garden-friendly shade.
- Use drawers for spoons, measuring cups, chalk, and pretend ingredients that need hidden storage.
- Raise the cabinet slightly on weather-safe feet so the base does not sit in wet grass.
An old cabinet can give a mud kitchen the charm of a tiny outdoor house. Instead of throwing away a worn bathroom vanity, nightstand, or kitchen base cabinet, turn it into a sturdy play station with doors, drawers, and built-in storage. Remove unsafe hardware, sand chipped edges, and seal every exposed surface. A cabinet base works especially well because it already has a solid shape and useful compartments. For many families, this is the fastest way to build something that looks custom without spending much money for a backyard corner.
The finished piece can feel surprisingly polished with a few simple changes. Replace glass inserts with wood panels, add rounded knobs, and cut a sink bowl into the top if the structure allows. Drawers can hold spoons, measuring cups, chalk, and small nature treasures. Doors hide buckets and extra pans when play is over. Use exterior paint in olive, blue-gray, white, or clay for a soft backyard look. Raise the cabinet slightly on weather-safe feet so the bottom does not sit directly in wet grass after rainy days with less damage.
10. Pebble Washing Area
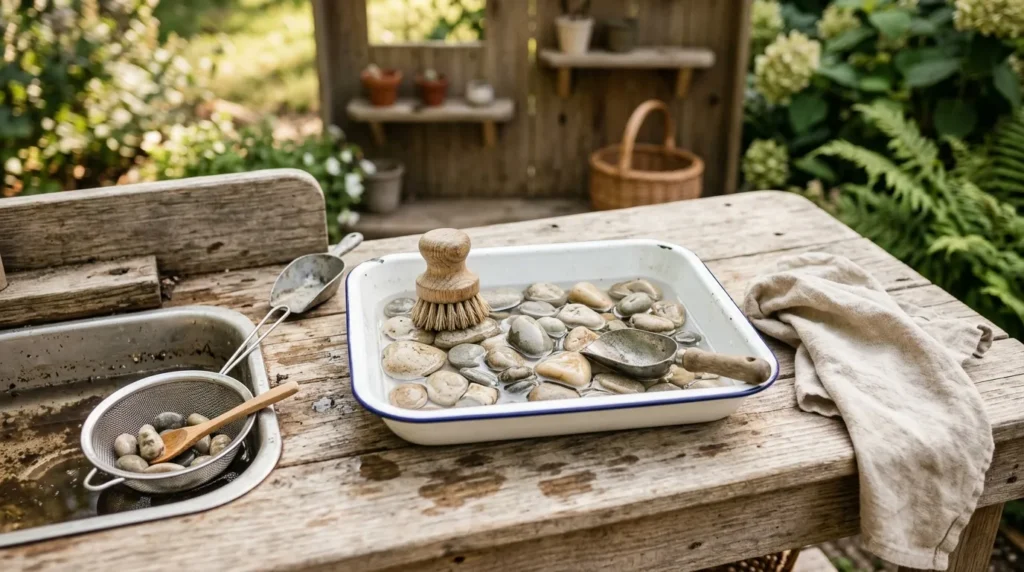
- Add a shallow tray or tub where kids can rinse, sort, scrub, and transfer smooth stones.
- Choose stones that are large enough for your child’s age and avoid tiny pieces for younger children.
- Include a small colander, scoop, scrub brush, and towel to create a realistic cleaning station.
- Use gray, tan, cream, and river stones for a calm natural look that photographs beautifully.
- Place the washing area near the sink so water has a clear purpose and cleanup stays easier.
A pebble washing area gives children a job they can repeat for ages. Kids love sorting, rinsing, and moving small natural objects, and a dedicated washing tray keeps that activity from taking over the whole counter. Use a shallow plastic tub, old enamel tray, or low wooden box lined with a waterproof insert. Fill one side with smooth pebbles and leave the other side open for rinsing. This feature is simple, but it adds rhythm because children can wash, transfer, dry, and sort again during long summer afternoons outside together.
The setup works beautifully near the sink or hose because it gives water a clear purpose. Add a small colander, scrub brush, towel, and scoop so kids can act out a real cleaning station. Choose rounded stones that are large enough for your child’s age and avoid tiny pieces for younger children. For a pretty visual, mix gray, tan, cream, and river stones inside a neutral tray. The area adds texture to the build and helps children practice focus, hand strength, sorting, and careful movement during calm sensory play outdoors.
11. Canopy Shade Spot
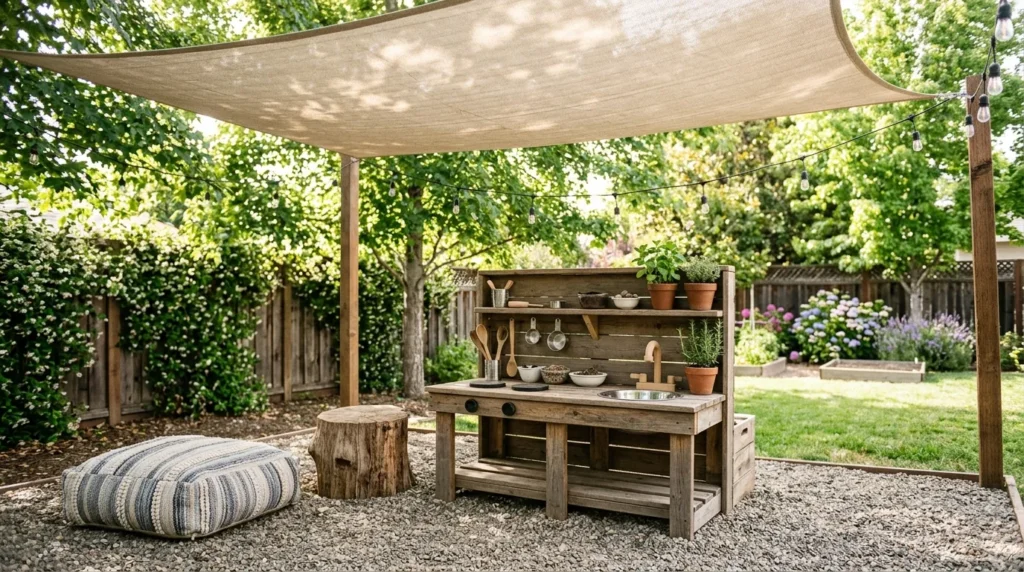
- Add a shade sail, fabric canopy, umbrella, pergola panel, or canvas drop cloth above the play space.
- Secure fabric firmly so it does not flap loose during wind or sag badly after rain.
- Angle the shade slightly so rainwater runs off instead of collecting in the middle.
- Choose neutral canvas for a calm natural look or stripes for a playful coastal backyard style.
- Add a stump seat, small bench, or outdoor cushion nearby so children can rest between play sessions.
Shade can decide whether a mud kitchen gets used for ten minutes or two hours. A canopy shade spot protects children from harsh sun, keeps surfaces cooler, and makes the play corner feel like a tiny outdoor room. You can use a fabric canopy, shade sail, patio umbrella, pergola panel, or canvas drop cloth tied between posts. Choose breathable material and secure it well against wind. In warmer USA regions, this feature is not just decorative; it can make afternoon play safer and more comfortable during sunny weekends in summer.
A shaded setup also looks softer and more inviting from the house or patio. Hang the fabric slightly above adult head height if possible, then angle it so rainwater does not pool in the middle. Neutral canvas gives a calm natural look, while stripes feel playful and coastal. Add outdoor cushions on a nearby bench or a small stump seat under the edge of the shade. The result feels like a backyard activity nook where kids can cook, rest, talk, and return to play without overheating on warm afternoons outside.
12. Tool Rail Display
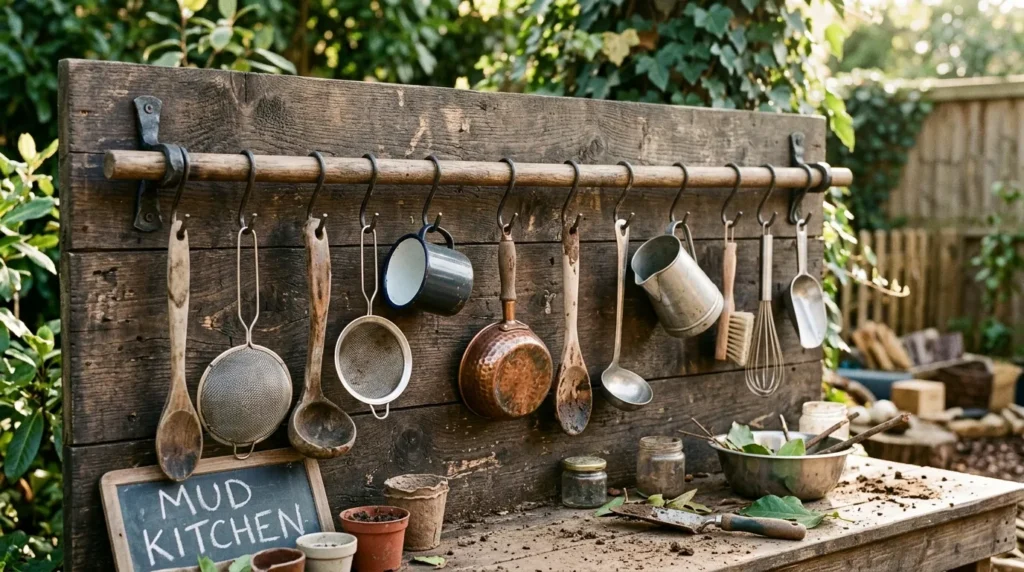
- Add a peg rail, towel bar, wooden dowel, curtain rod, or metal rail to hold play tools.
- Use S-hooks for spoons, strainers, tin cups, small pans, brushes, and lightweight ladles.
- Keep sharp, heavy, or breakable items out of reach, especially when younger children are playing.
- Group similar tools together so the rail looks tidy and helps children clean up independently.
- Mount the rail on a stained wood backboard if you want a warmer, more finished look.
A tool rail display makes the mud kitchen feel organized and real. Instead of tossing spoons, strainers, cups, and brushes into one bucket, hang them where children can choose exactly what they need. Use a towel bar, wooden dowel, curtain rod, peg rail, or slim metal rail fixed securely to the back of the station. Add S-hooks for tools with holes in the handles. This small detail improves independence because kids can set up, play, and clean up without asking where every piece belongs at their own pace each day.
The visual impact is bigger than the cost. A neat row of little pans, ladles, tin cups, and wooden tools creates that charming workshop look people love to save on Pinterest. Keep sharp or heavy items out of reach and use lightweight utensils from thrift stores or dollar sections. Group similar pieces together so the rail feels tidy, not cluttered. If you want a warmer finish, mount the rail on a stained wood backboard. It adds function, texture, and a satisfying finishing touch to the final backyard look outside today.
Slug
save-diy-mud-kitchen-outdoor-play-ideas
Meta Description
Save these DIY mud kitchen ideas before you build. Get practical backyard play setup tips using pallets, crates, gravel, herbs, shade, storage, and simple materials.
Image Prompts
1. Pallet Sink Station
Image Description: Rustic backyard mud kitchen made from a sanded wood pallet, stainless bowl sink, small hooks, tin cups, cedar stain, soft afternoon light, fence backdrop, gravel floor, simple towel peg, cozy handmade play café mood, eye-level Pinterest-style photo.
2. Crate Storage Wall
Image Description: Organized mud kitchen storage wall with stacked wooden crates, labeled baskets, spoons, bowls, pinecones, leaves, and small pans, soft earthy colors, fence-mounted layout, warm daylight, tidy farmhouse backyard style, clear vertical storage design, front-facing Pinterest image.
3. Mud Pie Counter
Image Description: Wide wooden mud pie counter with muffin tins, pie pans, wooden spoons, small bowls, smooth sealed surface, natural cedar tones, garden backdrop, child-height layout, soft sunlight, charming backyard bakery feel, clean Pinterest-style composition from a slight angle.
4. Gravel Floor Zone
Image Description: Defined outdoor play area with pea gravel flooring, timber edging, mud kitchen station, small outdoor mat, neutral wood textures, green grass border, sunny suburban backyard, clean drainage-friendly layout, practical family yard design, wide-angle Pinterest photo.
5. Garden Hose Tap
Image Description: Backyard mud kitchen water station with mounted water jug, small hose tap, removable sink bowl, clean and muddy tubs, watering can, cedar wood frame, light gravel floor, bright summer lighting, practical sensory play setup, close Pinterest-style view.
6. Chalkboard Menu
Image Description: Mud kitchen with black chalkboard menu, handwritten pretend recipes, wood frame, small chalk tin, spoons, bowls, neutral pallet station, rustic fence background, soft natural light, playful café styling, high-contrast Pinterest image with cozy backyard mood.
7. Potting Bench Setup
Image Description: Repurposed wooden potting bench used as a mud kitchen, removable sink bowl, lower shelf with buckets, galvanized tubs, woven baskets, muted stain, garden plants around it, warm natural lighting, useful farmhouse backyard play station, angled Pinterest photo.
8. Mini Herb Corner
Image Description: Mud kitchen herb corner with terracotta pots of mint, basil, rosemary, and lavender, small plant labels, wood counter, metal buckets, green garden textures, soft morning light, fresh sensory play mood, close-up Pinterest image with natural colors.
9. Recycled Cabinet Base
Image Description: Old painted cabinet transformed into a mud kitchen, olive green exterior paint, rounded knobs, small sink bowl, drawers for tools, raised weather-safe feet, backyard fence setting, soft clay and wood tones, charming recycled furniture play setup.
10. Pebble Washing Area
Image Description: Pebble washing tray beside a mud kitchen sink, smooth gray and tan river stones, small colander, scrub brush, scoop, towel, shallow enamel tray, natural wood surface, gentle outdoor light, calm sensory play layout, detailed Pinterest close-up.
11. Canopy Shade Spot
Image Description: Shaded backyard mud kitchen under neutral canvas canopy, wood play station, gravel floor, stump seat, outdoor cushion, soft filtered sunlight, relaxed summer mood, secure shade sail above, cozy outdoor room feeling, wide Pinterest-style backyard view.
12. Tool Rail Display
Image Description: Mud kitchen tool rail with hanging spoons, strainers, tin cups, small pans, wooden ladles, stained backboard, S-hooks, tidy arrangement, rustic wood textures, warm afternoon light, organized workshop-style play corner, close Pinterest image with clean styling.
4. Introduction
Creating a backyard mud kitchen is a perfect way to combine fun, learning, and sensory experiences for children. These DIY setups allow kids to engage hands-on with soil, water, and natural materials while exploring imagination, creativity, and teamwork. Preparing ideas before building ensures a functional, safe, and visually appealing play area. Whether your yard is small or spacious, careful planning with versatile materials allows for a structured yet flexible setup. In this guide, you’ll discover practical, actionable, and visually inspiring mud kitchen concepts that make outdoor play more engaging, organized, and exciting for children.
1. Pallet Counter Base
- Repurposes old wooden pallets into a sturdy kitchen foundation
- Adds natural textures and rustic appeal
- Provides space for trays, hooks, or bins
- Cost-effective and environmentally friendly
Using a pallet counter base creates a practical and tactile starting point for a DIY mud kitchen. Pallets are widely available, durable, and offer open slats that naturally allow water to drain during messy play. Sanding edges and sealing with non-toxic treatment ensures safety while maintaining rustic charm. This base supports a wide range of setups, whether adding shelves, bins, or small hooks. I’ve noticed that children are drawn to the tactile nature of wood, which enhances sensory engagement. The pallet base is both functional and visually cohesive, providing a strong foundation for outdoor play and interactive experiences.
Once set up, the pallet structure can be enhanced with shelving or crates for organized storage of bowls, utensils, and mud ingredients. Hooks for scoops or ladles can increase usability and encourage children to return tools to their place, promoting responsibility. Its modular nature makes it easy to expand or move, offering long-term flexibility for different play scenarios. This setup transforms a simple backyard corner into an interactive and engaging area that encourages tactile exploration, creativity, and cooperative activities for multiple children at once.
2. Portable Basin Station
- Uses shallow bowls for contained mud and water play
- Lightweight and movable for flexible layouts
- Reduces mess while enhancing sensory experiences
- Supports multiple children simultaneously
Portable basins allow controlled exploration of water, mud, and natural elements. Shallow bowls make mixing, scooping, and pouring safe and manageable for kids. I’ve seen this setup extend playtime as children enjoy experimenting with textures without creating excessive outdoor mess. Plastic, metal, or recycled containers can be used depending on durability and budget. The mobility allows you to move basins indoors or outdoors depending on weather. This practical design provides tactile, sensory-rich engagement while keeping the area clean and organized for extended outdoor play sessions.
These basins can be placed on tables, pallets, or directly on waterproof trays. Children enjoy experimenting with mud, water, leaves, and small natural items to create “recipes” or imaginative concoctions. Adding utensils, sieves, or scoops enhances fine motor development while encouraging collaborative play. The portability of the basin station allows easy cleanup and rotation of materials. This versatile setup transforms an ordinary backyard space into an interactive, educational, and engaging mud kitchen environment. It’s simple to implement, safe, and encourages creativity in structured sensory play.
3. Upcycled Furniture Counter
- Converts old cabinets, dressers, or tables into functional kitchens
- Drawers or shelves provide storage for tools and materials
- Paint or chalkboard panels enhance creativity
- Adds realistic, child-friendly kitchen appeal
Transforming unused furniture into a mud kitchen counter combines sustainability with functionality. Cabinets or dressers offer durable surfaces for mixing mud while drawers provide accessible storage for utensils, bowls, or natural elements. Adding chalkboard panels encourages creativity, writing, and drawing, enhancing educational play. I’ve seen this approach increase engagement, as children feel like they are using a real kitchen while practicing imaginative scenarios. Upcycling reduces waste and adds character, making the backyard visually appealing while providing practical play functionality for kids.
Functionally, furniture counters create an interactive space where kids can organize materials, “prepare meals,” and return utensils independently. Hooks or small baskets on the sides further enhance storage options. The setup accommodates multiple children simultaneously, encouraging cooperative play. It’s visually appealing and provides a defined area for imaginative cooking or mud creations. This DIY solution is cost-effective, customizable, and integrates seamlessly into various backyard layouts, offering both aesthetic charm and practical usability for hands-on outdoor play experiences.
4. Tiered Crate Shelving
- Uses stacked crates to maximize vertical space
- Organizes utensils, bowls, and mud ingredients
- Encourages sorting, coordination, and independent play
- Adds visual interest and dimension to the kitchen area
Tiered shelving with wooden or plastic crates provides practical storage and play organization. Vertical arrangements allow multiple compartments for utensils, containers, and sensory materials, keeping the area accessible and engaging for children. I’ve noticed that this setup promotes both creative and cooperative play, as kids can access different levels simultaneously. Lightweight crates allow for repositioning and adaptability, making it suitable for seasonal adjustments or expanding play options. The layered design also enhances the visual appeal, giving a sense of structure without limiting imaginative exploration in the backyard.
Each tier can hold specific materials like mud, water, leaves, or small toys, teaching children organization and sorting skills. The vertical arrangement adds depth and visual variety, creating a Pinterest-worthy aesthetic. Kids develop coordination and spatial awareness by reaching different levels during play. This setup encourages independent and collaborative engagement while maintaining an organized, functional, and visually appealing play area. The crate shelving integrates seamlessly with other kitchen elements, supporting educational and imaginative experiences efficiently.
5. Hanging Utensil Rod
- Hooks utensils, ladles, and scoops for easy access
- Keeps counters clear and organized
- Encourages independent responsibility and structured play
- Adds vertical design and visual charm
A hanging utensil rod immediately improves accessibility and organization in a mud kitchen. Installing a wooden dowel or metal rod above counters provides a designated space for small tools, encouraging kids to grab and return utensils easily. I’ve seen this setup extend playtime as children enjoy having tools clearly visible and reachable. S-hooks, clips, or small pegs allow flexible attachment of different utensils. This design not only maintains a tidy workspace but also introduces children to organizational habits, enhancing functional play and creativity.
The hanging rod transforms the kitchen space by keeping counters free for mixing, scooping, and imaginative creations. Children can sort utensils by type or size, supporting fine motor development and responsibility. The vertical element adds aesthetic interest while making the setup visually complete. Parents benefit from reduced clutter and simplified cleanup. This small addition enhances usability, accessibility, and playfulness, creating a functional, interactive, and visually appealing backyard mud kitchen that engages children and encourages extended sensory exploration.
Image Descriptions
- Pallet Counter Base – Stacked wooden pallets forming a rustic mud kitchen counter, natural wood textures, slatted shelves, hooks for utensils, bright sunlight, lush backyard greenery, tactile and eco-friendly layout, organized and inviting design.
- Portable Basin Station – Wide, shallow basins on wooden table, filled with water and soil, spoons and scoops visible, sunny outdoor lighting, clean and practical setup, safe sensory play area, bright and playful backyard corner.
- Upcycled Furniture Counter – Painted old dresser transformed into mud kitchen, chalkboard side panel, drawers for utensils and materials, sunlight on lawn, visually charming and functional DIY setup, interactive child-friendly layout.
- Tiered Crate Shelving – Stacked wooden crates with bowls and utensils, layered vertical design, natural textures, sunny outdoor lighting, organized and playful area, rustic aesthetic, functional and accessible sensory station.
- Hanging Utensil Rod – Wooden dowel with hooks holding mud kitchen tools, bright daylight, vertical organization, child-friendly accessibility, clean and structured layout, playful and practical backyard setup.